Sunday, October 27, 2013

Bathroom Cabinets

After my Dad had painted our bedroom and master bath while we were in Nashville- I got a wild hair to refinish our bathroom cabinets. Our bathroom and the kids bathrooms were the only things not remodeled/updated before we bought our house (which is 15 years old.) With the new paint- I decided I wanted to spice up the bathroom a bit more and get rid of the plain, oak cabinets. I had no idea how to do it, so after doing many Google searches, I decided to go to Home Depot and talk with the experts in the paint department. They HIGHLY recommended this product:
Instead of sanding and stripping each cabinet/frame/door, you follow this kit step by step. It ran around $65, but they said they have never had a complaint about it, and its the way to go. So, trusting them, we bought it. It comes with an instructional DVD I watched first, and then I followed along in the written guide as well. 

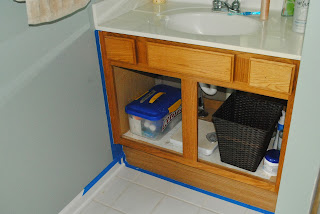
"Before" pictures
Step one:
Remove doors from the frame and tape areas you want to stay clean (i.e. I tapped along the walls and the floor) Tip: Tape really well and really tight to the frame so it doesn't leak onto your wall)


Step 2:
Deglosser. This is basically a liquid use you with a scratch pad and rub it really well over the whole frame and doors. It strips away all the finish that is already on the doors. It is really easy and doesn't take long to do. Let it dry for specified time before next step.

Step 3:
Paint. This is when you paint on your tinted base. Just like painting walls, you use a regular brush its not difficult. Just make sure you don't let it "goop" in the corners and let in "run" down. Let it dry specified time before next step.Tip: For the doors, it take a bit longer, because you can only do one side at a time - so paint one side, dry, flip and paint other side, dry. Finishing the doors takes the longest.


I chose the color Expresson, but there are about 20 different shades/colors you can choose from with the kit. You have them mix the color at Home Depot when you buy the kit.

Step 4:
Decorative Glaze. This step is optional. The glaze basically gives the cabinets a more "custom" look, pulling out the grains in each door instead of having just a flat painted look. I chose to do the glaze, and am so happy I did. You paint it on with a brush, and then immediately wipe it off with a rag provided. You have to let this step dry longer than the previous two before moving onto the last step.

Step 5:
Top Coat. Basically the protective coat so prevent scratching/peeling. Again, just use a brush and paint it on, letting it dry much longer (8 hours or more) before you can put your doors back on/drawers back in. 

Honestly, it was really easy- just very time consuming. With to wait for each step to dry, it took me a good 5 days (although I could only work while the kids napped or at night- so I bet you could do it in 3 days if you could work non-stop.) It also takes long because of having to flip the doors and wait for each side to dry. For anyone wanting to refinish cabinets, I HIGHLY recommend the product and I am so happy with the outcome. Sometime in the future we hope re-do the floors (get rid of the white tile) and get new counters. Here is the finished product:


*Side note: This kit comes with quite a bit of product. I was able to do two vanities and a set of three drawers and still have enough to do the kids bathrooms (a double vanity sink) and our bathroom in the basement (a single vanity sink.) I think it is ideal to use for a kitchen with lots and lots of cabinets, but it works out great for us as I can now do all three bathrooms!

Wednesday, October 23, 2013

An apple a day keeps the doctor away.

I wish. We eat atleast an apple a day, but it isn't keeping our doctor away. Yesterday morning I took the kids to get their flu shots. I asked the nurse to just look at Preston's burns on his fingers (as some are getting red and not healing) and she took one look and said, come back tomorrow and see the doctor. So, back we went this morning. 3 of them are infected and the one on his thumb she is worried about. He is not bending his thumb at all, and she is worried that scar tissue will heal tight and he wont have a good range of motion with it. She prescribed a cream to help treat the skin, and then an antibiotic to help with the infection within his thumb. She wants us to go back next Wednesday for a re check, and if he still is not bending it, he will need to wear a special glove on that hand that will help it heal properly.
While we were there, I also had her check Reese as she has had a cold for 5 days now, and she isn't getting any better. Two days ago she got a nasty cough, and sure enough, she has an ear infection in her right ear. Crazy as she never got many ear infections as an infant, and now she seems to be getting them everytime she gets a cold. Guess we need to start eating two apples a day in this house!

One more delicious crock pot recipe for you- one of the best pot roasts I have EVER had I made last night. It was SO yummy, and so easy.


Crock Pot Beef Roast
Ingredients:
1 pkg. Hidden Valley Ranch Dressing
1 pkg. low sodium Brown Gravy (I used McCormicks)
1 pkg. powdered Italian dressing

Combine the 3 ingredients with 1/2 cup water, and pour over roast. My roast was frozen, and I put it on LOW in the crockpot for 7 hours. It was SO yummy. So tender and juicy. I HIGHLY recommend trying this recipe!


Monday, October 21, 2013

Slow Cookers

It's that time of year when I love to pull out my slow cooker a.k.a crockpot- which I tend to use ocassinally all year round, but really start it's prime use in the fall/winter. With our grilling season coming to an end- which consumes most of our summer- I am always hunting for new an delicious slow cooker recipes to try. I have come across 2 different recipes on Pinterest, and both were fantastic- so good, I though I would share with you. They are easy prep- and basically throw ingredients in and be on your way!

First was the chicken tacos we had last week. SO yummy, and so easy.
Clean Eating Crock Pot Chicken Tacos- click on the link to take you to the site


Ingredients

1 lb (or about four 4 oz)Chicken breasts

1 cup (8 oz)

Salsa (I used one with corn and black beans)

1/2 cup (half of a 10 oz) can

Rotel diced tomatoes with green chilies 1
Optional:1 tbs taco seasoning 2
Optional Taco/Salad Fixings:
Low carb/whole grain tortillas, shredded lettuce, avocado, cilantro, black olives, avocado, corn, black beans, plain low fat greek yogurt
1 This gives the chicken a bit of spice and flavor, but if you are making this recipe for children, or you don't like any spice, I suggest using plain diced tomatoes!
2 Make your own taco seasoning by mixing together 1 teaspoon chili powder, 1/2 teaspoon ground cumin, 1/8 teaspoon salt. Be sure seasoning is gluten free if sensitive.

Method

THE ESTIMATED TOTAL TIME TO MAKE THIS RECIPE IS 4-8 HOURS.
1
Put all of the ingredients (except for toppings) in crockpot and cook on high for 4 hours or on low for 6-8 hours. Remove the chicken from the crockpot and shred. Add chicken back to the crockpot and stir to combine everything. Serve over lettuce or on low carb tortillas, and top with veggies and/or suggested toppings.


We garnished our with lettuce, avocado, cheese, tomato, and sour cream. I also like to add black beans and black olives sometimes.

Next up is Slow Cooker Chicken Tortilla Soup. Another big hit.
Slow Cooker Chicken Tortilla So
For some reason, I couldnt copy and paste the ingredients, so click on the link above to take you to the full site. Enjoy!

Saturday, October 19, 2013

Field Trip

Reese had her first field trip Monday with her preschool class. Let's just say the day started out a little rough. We had to leave by 8:45 am, which to us, is early :) Around 8:25, Preston decided that when I turned my back for no more than 5 seconds, he wanted to grab a hold of my flat iron and burn 6 of his 10 fingers. I literally turned around to shut the shower curtain, and turn around to see him holding the hot iron- which led to me grabbing it away, and him shrieking in pain and fear. I knew we couldn't miss the field trip or Reese would be devastated, so I rubbed antibiotic ointment on the burns/blisters, and we headed out (on time actually.) He cried the while 30 min ride, but I knew once we got there, the excitement would help him forget, which it did. He was fine all morning. Our neighbor is a wound specialist, so I had her come over and look at them on Wednesday, and she said they blisters are tough (a good sign) and to let them gradually pop and drain, making sure to keep them clean when they pop so the open sores don't get infected. Thus far, 4 of the 6 have popped, and I have been cleaning them out multiple times a day. They don't seem to bother him at all, he plays, eats, and does everything with his hands normally.
So, back to the field trip. Once we got on our way, we had a great time. It was so fun to see Reese interact with all her little friends :) We went to the local apple orchard/pumpkin patch. First we did a hay ride out to pick pumpkins, then the kids had a lesson on apples, and then we picked apples to take home. The weather was perfect fall weather, and Preston was a trooper through the whole thing with his poor little hands.
Reese and her "best friend" Tyson

 The 3 year olds learning about apples

 Apple picking 


Reese's 3 year old class- I had to post this one- look at her strike a pose! :)


Loving her caramel apple from the orchard

Friday, October 11, 2013

Louisville and Nashville

Last week, Kyle and I got the pleasure of having our first "vacation" alone together since our HONEYMOON! Yep, it's been that long since we have been away together (minus nights we have gone to a wedding or things like that.) But to actually relax and leave the kids behind- never done it! Until last week when my parents came out and watched the kids from Thur-Sun so we could enjoy some time away.
Thursday morning we took off and headed for Louisville, KY (about 2 1/2 hrs away.) Our whole motto for the weekend was "fly by the seat of our pants." We had ideas of things we wanted to do, but no set plans, and we were only going to do what we wanted, when we wanted to. It was amazing. No schedule, no whining kids, no dirty diapers to change, and basically, no rules! FREEDOM :)
Thursday when we got to Louisville and checked into the hotel, we then walked around downtown and ate at a yummy local taco joint. We then toured a huge antique/flea market building before heading over to the Louisville Slugger Factory and Museum. I have to say I wasn't too overly excited to tour a baseball bat museum, but went along for the ride as I knew Kyle would enjoy it. Turns out, it was great! They were actually making the bats for the playoff games and we go to see Tampa's bats being made. Pretty cool. Kyle got to touch one of his favorite St. Louis Cardinal players bats- so it was a hit...no pun intended :) Thursday night we ate at an AMAZING smokehouse place called Doc Crow's. Some of the most delicious barbecue and ribs we have ever had. Little did we know, that wouldn't be the last time we ate barbecue because it was SO delicious in the south. After dinner we hit up Fourth Street Live in downtown, where all the bars are. We had a great time at a bar with dueling pianos.

Fourth Street Live

Friday morning we took off and headed for Nashville (about a 2 hr 40 min drive from Louisville.) After checking into the hotel, we headed straight down to the main "tourist" area of Nashville where all the shops/restaurants/bars are. We ate lunch/ watched the Cardinal game and then headed out to check out some live music in the bars. They have live music in literally EVERY bar on Broadway street- and it's all great singers/songwriters. We basically hopped around and checked out different bars/different singers all afternoon! We ate dinner ate a great place called Sambuca- sitting on a ledge outside overlooking the West End of Nashville. We then met up with an old friend of mine, Ashley Becker, back downtown and hopped around a few bars with her and her fiance. We had a great day.

As you can imagine, we were slow moving Saturday morning. I am not used to drinking that much/staying up that late, and it was hard for me to get motivated to move Saturday. I think we finally got out of the room around noon and headed to Edley's- a barbecue joint that we heard rave reviews for. And it did not disappoint. If you ever go to Nashville, this place is a MUST. We waited in line at least 30 minutes (by we, I mean Kyle- I was sitting down slowly sipping water in hope to re-hydrate myself!) They had the best pulled pork nachos I have EVER had- and probably will ever had. It was the best pulled pork with the works all on top of homemade potato chips- to.die.for. Also, the perfect food for a hangover :) After lunch we then toured the original Grand Ole Opry- now known as the Ryman. It was self guided tour and was really neat. So much history in one place. I highly recommend it- even if you are not a country music fan. Saturday evening we hopped in the car and went to Brentwood, TN- about 20 min south of Nashville, so have dinner/drinks with one of Kyle's friends from undergrad and her family. We had a great time catching up (we haven't seen them for at least 4 years or so.) Sunday we packed up and headed back home- of course only after sleeping in- which was a must since we never get to! We had a great time and I will be going back at some point- such a neat city!!

Boot Country!

The Ryman

Touring the original "Grand Ole Opry"

Thursday, October 10, 2013

Tuttles Apple Orchard

A few weeks ago, we headed to an apple orchard/pumpkin patch near our house. Here are a few pics from our visit. Usually our visit consists of fall like weather, sweatshirts, and long pants, but with the unseasonably warm weather, we were almost sweating picking apples in the near 80 degree temps. With our apples we picked, I made an apple pie (which only lasted 2 days) and an apple crisp (that lasted less than 8 hours.)